Pin and bushing selection
Excavator Pins and Bushings: A Buying Guide
An excavator pivot pin works with a bushing and the bore that holds it. Replacing the pin alone may leave the original looseness if the bushing or housing is worn. Before ordering, identify the parts that will stay in service and the dimensions that control their fit.
This guide helps you turn a drawing, a part reference or a worn sample into a specification a supplier can review. Start with what you know; mark the gaps instead of guessing.
Check both fits in the joint
A bushing is a sleeve between the pin and its housing. Its inner surface works with the pin; its outer surface fits the housing bore. These are separate interfaces. A drawing that gives only the pin diameter leaves the second one undefined.
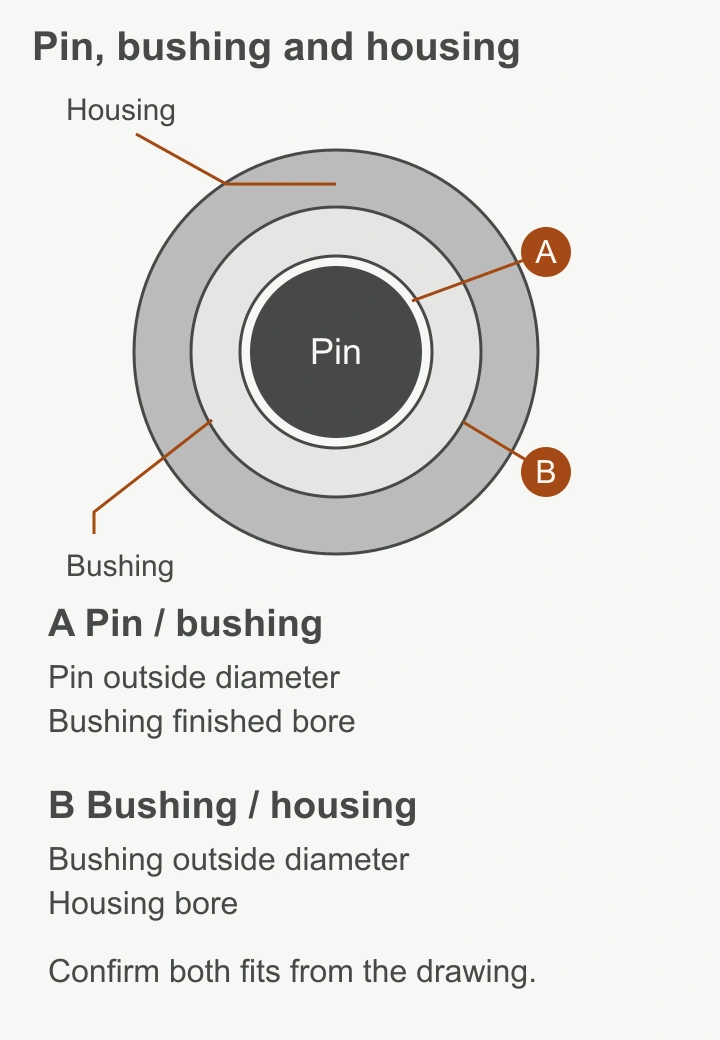
A and B identify separate fits. Use the assembly drawing to specify each pair of mating surfaces.
Open diagram ↗Pin ↔ bushing bore
Record the pin diameter and the bushing’s finished bore, along with their tolerances, contact length and required surface finish. Identify where relative movement is intended.
Bushing outside ↔ housing bore
Record the bushing outside diameter, housing bore and the fit required by the assembly drawing. Say whether the housing will be reused, repaired or replaced.
State whether a bushing bore is checked before or after installation. For a design that uses an interference fit, ask the engineer to confirm the installed bore requirement. A loose bushing measurement and an assembled bore measurement answer different questions.
If a new pin is going into an old joint, send the condition of the mating parts with the enquiry. The supplier needs that information before confirming the replacement dimensions.
Keep design dimensions separate from wear measurements
A worn pin can help identify a part, but its smallest measured diameter is not the original design size. The same problem applies to an enlarged or uneven bushing bore. Keep the measurement, its location and its source together.
| Record | Include | Confirm before manufacture |
|---|---|---|
| Controlled dimensions | Drawing number, revision, units, limits and datum references. | Which drawing or verified part reference controls the order. |
| Pin measurements | Diameter at labelled positions, overall and working lengths, shoulders and end features. | Original dimensions and tolerances where the surface is worn. |
| Bushing and housing | Bushing bore, outside diameter and length; housing bore and condition. | Mating fits and whether bore acceptance is before or after installation. |
| Uncertain features | A photograph with the feature marked and a note explaining what is missing. | The missing value or a plan to establish it—do not estimate it from the photograph. |
When you only have a worn sample, send an overall view, both ends, visible holes and grooves, and any readable markings. Add the machine model and serial or parts-book reference if available. Label field measurements as measured values, not drawing dimensions.
Use existing inspection records or have the joint assessed under the machine’s service procedures. Do not dismantle a loaded joint or approach moving equipment to collect information for a quotation.
Specify the material condition as well as the grade
“What is the best material for an excavator pin?” needs more context than the machine name. The pin size, mating bushing, load and shock conditions, lubrication and required heat treatment all belong in the review.
ROCKVANTA’s documented connecting-pin series include 4140 and 4340. For your part, identify the exact material specification and condition on the drawing; confirm the bushing material separately.
If the grade is unknown, say so. A photograph or a hardness reading cannot establish the full material specification. Ask the supplier what sample identification or testing is needed, and agree the material before the production quotation is finalised.
For an alternative grade, request the proposed specification and the properties to be checked. Keep that change visible in the quotation rather than accepting an unnamed “equivalent”.
Put the hardening requirements on the drawing
A hardness requirement needs a location and a method. It also needs to be separated from the extent of the hardened region: a surface reading does not describe the hardness profile below it.
Induction hardening heats the surface region of the steel before quenching. Use a marked drawing to show the surfaces to be treated. For the process background, see the NPTEL teaching note on surface hardening.
Hardening requirement sheet
Complete the agreed requirements; mark undecided items “to be confirmed”.
- Part and drawing
- Part number, drawing revision and the component being treated.
- Material and condition
- Grade, governing material specification and required supply or core condition.
- Treated surfaces
- Mark the working surfaces and the start and end of each treated zone on the drawing.
- Surface hardness
- Required range, hardness scale, test method and measurement locations.
- Hardening depth
- Required value, units, depth definition, acceptance criterion and measurement method.
- Other acceptance checks
- Core properties, final dimensions, surface finish and any specified crack checks.
A line that says “hardening depth” still needs a definition. Ask which depth is being specified, how it will be measured and what criterion determines the boundary. Do not relabel an existing depth value as effective case depth unless the drawing or test requirement defines it that way.
Agree whether a depth check uses a test piece or a section from the part, and how it represents the production batch. Put the required records and sampling basis in the inspection plan before comparing prices.
For the available processes, see heat treatment and hardening. The selected part still needs its own treatment and acceptance requirements.
Show the lubrication passages and retaining features
A pin can match the main diameter and length yet have a grease hole or retaining feature in the wrong place. Include the features that connect it to the rest of the joint.
- Lubrication: hole positions and diameters, cross-drillings, groove shape and the required alignment with the mating component.
- Retention: shoulders, end plates, threads, circlip grooves or other retainers shown on the assembly drawing.
- Axial location: working length, end projection, spacers and the faces that locate the parts.
- Sealing: seal locations and mating surfaces where seals are included in the joint.
Mark these features on the drawing or on labelled photographs. Let the supplier know which retainers, spacers and seals are included in the order and which existing parts will be reused.
Compare the acceptance checks as well as the price
Send each supplier the same drawing revision and inspection requirements. If one quotation includes a material record, a hardness report and final dimensional results, check whether the other covers those items too.
| Check | Agree before production | Requested record |
|---|---|---|
| Dimensions and finish | Critical interfaces, tolerances, measurement condition and the specified finish. | Results linked to the drawing revision and part or batch. |
| Material | Grade, specification, supply condition and required traceability. | The agreed material certificate or test record. |
| Hardening | Treated zones, hardness locations, depth definition and sampling basis. | Hardness and applicable depth results with the method identified. |
| Additional testing | Any specified magnetic-particle or other NDT method, acceptance criteria and coverage. | A report for the agreed inspection scope. |
A connecting-pin series may have its own inspection programme. Confirm which checks apply to your order rather than assuming that the same coverage extends to every bushing or shaft. Our quality and inspection page explains how the inspection scope is agreed.
Send the drawing—or start with the part you have
You can send the enquiry before every field is complete. ROCKVANTA will review the available information and list the dimensions, material or inspection points that still need agreement.
You have a drawing
Send the latest revision with the mating fits, material and treatment requirements. Add the quantity and any required inspection records.
You have a sample or photographs
Send the visible part reference, labelled views and measurements with their sources. Explain the wear or fit problem and identify the parts you intend to reuse.
For documented LCP series and the current supply references, visit pins, bushings and shafts. Use the series table to discuss a starting point; send the selected part and quantity so ROCKVANTA can confirm the quotation scope.